Film Opening-https://youtu.be/nuur4Wmc85M
CCR 1 and 2-https://youtu.be/N0Ou28P8MhM
CCR 4 and 3-https://youtu.be/Ab_SYopNO34
Film Opening-https://youtu.be/nuur4Wmc85M
CCR 1 and 2-https://youtu.be/N0Ou28P8MhM
CCR 4 and 3-https://youtu.be/Ab_SYopNO34
Overall, this was one of the most challenging yet fun projects I've ever done. I mean what makes something fun is the challenges involved with it and this was difficult to do since I had to get this done before I left for vacation. But, I'm going to miss recording film opening with my friends and hanging out but what I'm not going to miss is the challenges and stress throughout this. I mean that nicely it's not bad but throughout this project, I've lost footage and editing components that I needed to re-edit some scenes and I couldn't because I had to keep the last footage I had. But I would like to think I did a great job and I love to see what grade I'm going to get. Moreover, throughout this whole project editing and filming would have to be my favorite part, although writing my CCR scripts was almost as fun as doing those things. Hope you enjoy my film opening and CCR and I hope to do this again someday.
While filming I had some funny bloopers, you can also hear my father in the background and some Portuguese since that's my family's language. Although memorizing the scripts was annoying it was funny seeing myself fail over and over again.
For the beginning of my CCRs, I did some planning on how I would make each CCR with a planning sheet as well as get the materials I would need to make all of them. This included my camera, phone, microphone, and my planning sheet.


This is my final script for my CCR the journey has been amazing, and I don't regret taking this course it was fun and an interesting experience. Regarding that, if you want to see my final CCR script it will be here.
Today we are less than 2 weeks away from submitting my CCRs and film opening, so we decided to do a group meeting, this included taking brief notes on advice and taking a picture with my group. However, in my group we are currently struggling with finding dates that we are all free to film, for example, we were planning to film on Tuesday, one week all 3 of us could at first, but one of us last minute said he had a meeting which caused us not to go. We made a big impact on this since we could've already finished our project, but we are maneuvering through it and filming together on Thursday. This will help us finish and edit our projects on time while leaving enough time to finish our CCRs independently. The group meeting is set up using random groups, and we all talk about our project while taking notes on advice that we should include in our video or take out. Moreover, the notes and my partner's notes from the film opening were both short, which means we are on to success since there are few corrections we need to make. This is a picture of my notes and group!!


CCR question #2 was a straight path for me as I already did research on target audience and so all I need to do was integrate it into my script. Aswell as most of the other things I needed to include in my CCR such as where should I distribute my opening to target audiences. In the script I also added statistics and research about target audience. So, I hope you enjoy my script you can access it here. Enjoy!!
For my CCR question #1 I would like to think I did a great job, but I will need to wait for my grade. However, I expressed all of my feelings with the question and included different pictures of research I did. Most importantly I included what I should show and say while filming so it is easier for me to plan and edit the full thing out. While doing this script I took advantage of one of my blogs (Script blog) and used it for some help with the looks of the script.
Here is my script. Enjoy!!
Credits
For this editing blog, I saved it for the credit sequence, this is the fun bit of the editing since it's more challenging and requires skills with fonts and placements of words. Although it was my first time editing a credit sequence, it was a very fun experience and improved a lot of my problem solving skills. This is because while I was editing the size and placements, many things were off, the first thing was the title introduction, it was popping off from the bottom right and ending up big in the top left, but I wanted it to stay in the middle and get larger every second. I resolved this mistake by also, instead of timing the size of the font, changing the placement of the letter so that every second it stayed in place. Additionally, another similar mistake I had was with the credits where I couldn't place them in the same locations I've had before, so they were all spread apart every time a new credit appeared. I fixed this mistake by taking off the fades and looking at where the last ones were and aligning them with the new credits. So I think this enhanced my abilities of editing (and my patience) because I somewhat mastered how to place, size, and move texts to where I want them to be (as well as making them gradually increase, which you will see in my film opening). Here's what it looked like when I first started my credit sequence.


Filming- Day 2
For our day 3 of filming, we decided to repeat some things we did last week, since we thought it wasn't good enough, so this time, we did some of the same scenes, just with better quality, and it reached the point where it was perfect. However, when I got home, I went over the scenes and deleted some of them, turns out that was a big mistake, I deleted one of the good scenes and kept one of the bad ones. I resolved this by telling my group immediately and they were fine with it since they didn't really like that scene. So, on our last film day, which will be Sunday this week, we are going to film that part again and film the other final parts of the film opening. While filming, we were thinking ways we could transition into that scene without adding fades and editing transitions, so we could just do straight cuts. We wanted to do straight cuts because if we kept adding fades it would become way too repetitive. One of us had this idea while filming to make a neat transition happen.
Filming- Day 1 part 2
These are the shots that we will have to remake since they were too dark, this scene is meant to be about the guy leaving the bar and walking around clumsy and stumbling at night, but we realized in the night, the camera wasn't capturing the shots the way we wanted. So, we are resolving this problem by picking a time frame better and shooting when it's close to dark but still visible for the camera to capture great shots. Moreover, we will have to do this for the forest too, since we were planning on it being at night, but these 2 scenes in particular made us change our minds about the night time filming plan.

Filming- Day 1
On this day of filming, we are shooting the first scene (the bar scene). In this scene, we chose a brownish environment, and one of our props was an empty liquor bottle with apple juice inside. This was to make it realistic so the audience could suspect that the main actor was drinking alcohol (fake). We sometimes also encountered issues with opening the bottle or with lighting in general. Our shots were not always visible since it was very dark, so for our upcoming film day, we will do a better job at picking the time we are shooting.
Update on the mise-en-scene
My group and I decided that we will be filming at a mini bar in one of our places for the bar scene instead of the Town Center bar scene. This is because the bar at our house matches the tone we want to set for our film opening, which is dim and brownish color. Additionally, the props came in recently and we may not beat the doll up like we are planning on doing since it may add some extra realism if it's clean (that's just a thought). The group and I planned on beating the doll because we thought it would make it more realistic and chilling, but when the doll came in, we realized it was already very realistic and unique looking. Also, we have the perfect clothing ready for the bar scene, and for the forest, we are still going for that unique, business casual look. However, since we will be filming at a mini bar and not filming at a bar, we will have to switch locations after filming in our mini bar and go to a restroom that is in a bar or looks somewhat like the restroom of a bar.
Forest (similar, not the real forest that will be shown):

Bar (similar, not the real bar that will be shown)

Real Doll:

Real Clothing:

For the camera equipment, my group and I will be using a Canon EOS 60D, I gave the idea of this camera since I remembered my dad bought it a while ago, and it will be better to use than a regular iPhone. Moreover, I did get a brief understanding of it when my dad explained it to me while handing me the camera, but I don't think that will be enough to satisfy my demands on my project. So, I ended up doing some extra research about it to explore some extra interesting things about this camera and to help me and my group accomplish our goals with this project.
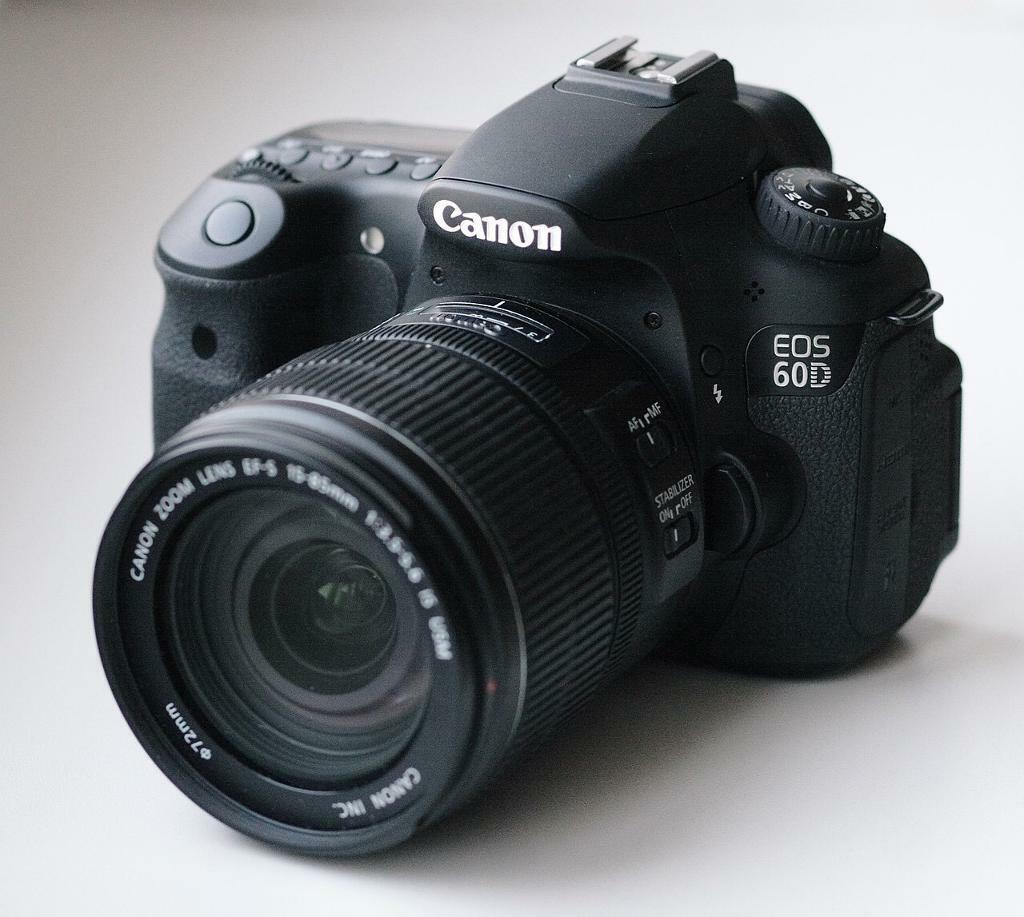
Furthermore, I not only did research on how to use it but also the specifications of the camera and what makes it a good camera (the technology that is inside the camera). The article states that the "Canon EOS 60D is a mid-range DSLR released in 2010 designed for photography enthusiasts and semi-professionals". This interesting thing about this camera is that even though it was released in 2010 it has 3K graphics and is paired with an "18-megapixel APS-C CMOS sensor with DIGIC 4 image." Additionally, all of this means it is capable of making images with "great detail and sharp color accuracy", this is perfect for my project as we will need detailed cinematography. There is also an "ISO range of 100-6400 (expandable to 12800) which allows for versatility in many lighting conditions while the continuous shooting speed of 5.3 FPS is useful for capturing action shots." It is great that this is included because I was worried that the camera wouldn't be able to see what we are doing since our set is mainly in the dark.
Although an older mode, the EOS 60D is a good choice for beginners due to these specifications, as well as its ease of use. The battery life of this camera is reliable from the article's perspective, saying it has "several hours of shooting," which is great for me and my group. While newer cameras offer more quality and faster processing, my EOS 60D still is great since I didn't have to spend much getting it (since I already had it), either way, if I had to purchase it for this project I would since it's very budget-friendly.
Sources-
https://www.canon-europe.com/for_home/product_finder/cameras/digital_slr/eos_60d/specifications/
Like I said in my scripts blog post, I will be uploading a storyboard, so here it is. I worked on this over the weekend and made some adjustments on it so it could sound a little better, so there may be some differences from the script. I included some more information about the shots/angles since I didn't include much of that in the script. Additionally, I did some research on a slide I found on why we make storyboards and it included some very interesting topics and facts which I didn't know about before.


Storyboards are an important tool in media studies as they help visualize scenes, plan shot composition, and ensure a clean narrative view before filming. Moreover, they serve as a blueprint for directors, editors, and cinematographers, reducing errors during filming and saving time. In my previous work, like my Eraser Story and One Word Film project, I would say storyboarding helped me map out important moments, frame shots, and help me while editing. In addition, the article stated that "Storyboards assist the filmmaker in realizing his or her vision. Not only do they assist with the artistic level of the future film, but also the budget, duration, and much more, depending on the quality of the storyboard creation." Overall, I thought this was a very important line since it shows the proper way to use the storyboards; while reading the slide and the article, all taught me how to make my future storyboards better.
Sources-
https://www.slideshare.net/slideshow/introduction-to-media-studies-storyboards/116967130
https://makestoryboard.com/blog/why-do-flmmakers-use-storyboards


Sources-

Nevertheless, in the bar scene, we want it to be dim and brown, so it can set the mood for the rest of the film. This same set will continue as the first couple of scenes in our film opening. After the bar, we will be located in a forest, these similar tones of color will be important for our film opening. However, for the bar to be the color we want it is tricky since most bars have their own unique vibe, but we are hoping for the bar in Town Center to be a great spot for us to shoot our film opening in.


My group and I have decided our set is going to be in a forest and bar, this specific forest is located in the Everglades, it's more of a river than it is a forest, but besides that, it is the perfect location for what we want to film. Additionally, the main reason we based it on a forest is that it is feared by many to go to a forest alone at sundown. Also, we will include a doll in one of our scenes hanging on a tree with a tie around its neck. Our location will look most similar to this picture below. The bar is going to go first, while introducing the main character, it is going to be a similar color scheme to the forest, with mainly brown colors, dim lighting, and drinks in the background. This is so we can set similar moods and tones throughout the film opening.


